“Everyone loves the Turkish getup. Except me. But they are so darn good for me I do them anyway. I do 20 per week usually with my snatch weight bell but sometimes just with a shoe… the Turkish get up is the cod liver oil of exercise lifts.” – Gary Music
He’s right. The get-up is good for you, but it also leads to frequent expressions of disgust. This article will outline the benefits for get-ups, provide progressive steps and tips for performance, and suggest basic programming in attempts to motivate you to incorporate this movement into your weekly training routine.
Benefits of the Get-Up
Here is why you should care about the get-up:
- Shoulder stability and mobility: The get-up is preventative medicine for your upper body. Holding a kettlebell overhead builds stability and mobility for your shoulders. Additionally, heavy get-ups will lead to pleasant surprises in your pressing strength.
- Thoracic extension and rotation: We do a number of exercises in the horizontal and vertical planes, but not many that call for rotation. The get-up builds rotational strength and patterning that is helpful for athletes.
- Linking motor patterns: The get-up builds bodily awareness and trains patterns that translate across athletic endeavors. This type of patterning is not available from bilateral exercises alone. Brandon Hetzler describes how the get-up mimics many of our developmental movement patterns such as rolling and crawling. Hetzler and other noted rehabilitation specialists, such as Gray Cook, use the get-up to rebuild proper movement patterns.
- Functionality: Getting off the ground is arguably the most functional of exercises.
Step 1: One-arm Press
- From the fetal position, roll onto your back and press the kettlebell up with your right arm.
- Keep your free hand over the right hand for extra stability.
- Your right knee is bent and your left leg is flat on the ground at a 45-degree angle from your body.
- Your left arm is positioned on the ground at a 45-degree angle from your body.
Note: The 45-degree angle is a starting point and will vary depending on your torso and arm length. - Lock your eyes on the kettlebell and keep them there for the next few steps.
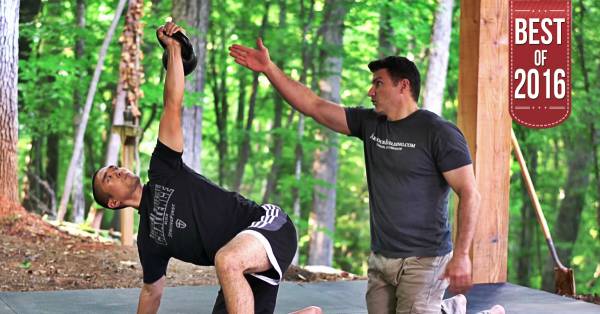
Step 2: To the Elbow
This step is often the most difficult because many people mistakenly just try to do a sit up. Keeping your torso as stiff as possible and your shoulders back and down, exert force into your right leg and left elbow to extend your right arm to the ceiling and rotate yourself up. This step is like throwing a punch. When you throw a punch, you don’t move your shoulder first and then rotate your body. Rather, your whole body rotates to extend the arm.
Step 3: To the Palm
This step is relatively easy. Keep your shoulders down and back, and imagine a straight line from the kettlebell (right hand) to the ground (your left hand). You want that line to be as solid as possible.
Step 4: Low Sweep or High Bridge
Step 5: To the Knee
Next, sit your hips back to bring yourself into a kneeling position. Your left leg will be at a 90-degree angle to your right leg. Pivot your left leg around like a windshield wiper so it is aligned with your front leg. Your gaze will now shift to the horizon instead of the kettlebell.
Step 6: Lunge Up
The lunge seems like a simple step, but treat it just like a squat in that you don’t want your knee to travel past the toes or track inward.
The Way Down
So much effort is spent figuring out how to get up that understanding how to get back down is often an afterthought. Here are important tips to make getting down easier.
- Control the descent. It’s not a race to the finish, so remain as tight and organized as you were on the way up.
- People often forget which leg initiates the decent. Use your free hand as a guide to tap the leg that will go back.
- From the knee, remember to “windshield wiper” the back leg 90-degrees. Rather than falling and finding the ground with your hand, this position allows you to hinge you hips back and use your hand to gently find the ground.
Programming
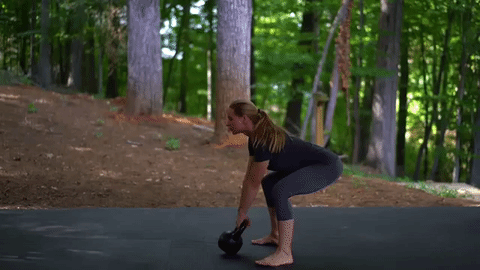
Here is the protocol (add more rest to build up to this goal):
- 5 Minutes: 20 swings per minute
- 1 minute: Rest
- 10 Minutes: 1 get-up per minute (alternate sides each minute)
You Don’t Have to Like Get-Ups
Spend time watching the videos to build your proficiency at the get-up. You might still dislike the movement, but as with most things that are difficult, it’s worth the effort. You’ll be surprised at how much stronger and more durable your shoulders feel, even if you do the exercise without weights. Ten get-ups a day, four times a week is optimal, but your recommended dosage will vary on your needs. Make sure you get in your weekly dosage of get-ups and over time, your face might not scrunch up in disgust.